- Freeze almond milk in an ice cube tray. Should take a few hours or so!
- In a blender, combine all ingredients in a blender except for the cacao nibs. Blend until slushy texture is reached.
- Lastly add cacao nibs and pulse in. Pour and enjoy
- Ice cube tray
- Blender or food processor
Serves 1
- 1 tsp Aiya Matcha
- 4 almond milk cubes (freeze almond milk in ice cube tray)
- 1 cup almond milk
- 1 tbsp maple syrup or 2 dates,pitted
- 1 tbsp cacao nibs
- 1/4 tsp himalayan salt (optional)
- 1 tsp maca (optional)
This Vegan Matcha Chip Frappuccino is refreshing, delicious and gives you that sustainable burst of energy you need to power through your day. I have been loving matcha for some time now and I am always finding new ways to incorporate it into my every day routine. I make this “frappuccino” either in the morning or when I need a mid-day pick me up! Its creamy slushy texture is perfect! I have been continuously using Aiya Matcha! The brand is really incredible quality and it is simply my favorite matcha. The amazing thing about Aiya is that they have a variety of different matcha products, some products specifically perfect for baked goods and others perfect for lattes!

Vegan Matcha Chip Frappuccino
For the bao buns
- In a large bowl combine all-purpose flour, baking powder, yeast and sugar in a large bowl, mix until well combined.
- In a small bowl mix the melted coconut oil and warm water.
- Make a well in the dry ingredients and pour in the liquid. Stir with a spoon and then use your hands to knead until the dough comes together. Place dough onto a work surface and knead for 7 minutes, adding extra flour a tablespoon at a time if the dough sticks to the palm of your hand.
- Place the dough in the mixing bowl, cover and set aside in a warm space for 1 hour or until dough is doubled in size.
- Once risen, transfer the dough to a work surface and dust with flour. ‘Punch down’ the dough by kneading it for another 7 minutes. Use a rolling pin to roll the dough out to 1 cm thick.
- Dip your fingers in coconut oil and lightly spread the oil over the surface of the dough. Then use an 8 cm diameter pastry cutter (or a wide rim mason jar) to cut out rounds. Remove the excess dough. Fold rounds in half and flatten slightly with the rolling pin.
- Place on a square of baking paper and place directly into a large bamboo steamer or onto a tray. Repeat with remaining dough (excess dough can be re-rolled and used).
- Cover the folded rounds and set aside for 30 minutes.
- Fill a pot (that fits with your steamer) with water and place over high heat. When the water is boiling, place the bamboo steamer over the wok and steam buns for 10 minutes. Then turn off the heat (don’t lift the lid) and allow the buns to rest over the hot water for 5 minutes.
For the pickled onions
- Combine all ingredients in a jar and let sit for 1 hour, then place in the fridge and let sit until ready to assemble.
For the filling
- In a pan over medium heat add 2 tsp of coconut oil. Once melted add gardein, and cook for 10-12 minutes. add half the packet of sauce, and reserve the other half of the sauce packet until ready to assemble. Then remove from heat.
- Prepare the other fillings.
For the assembly
- Heat other half of the sauce packet in a small sauce pan. Grab a steamed bag bun and spread a layer of sauce, followed by a few pieces of beefless gardein strips, carrots, a couple slices of cucumber, a sprig of cilantro and chopped cashews.
- Large bowl
- Small bowl
- Bamboo steamer (or regular steamer)
Makes 14-18 buns
for the bao buns
- 2 1/2 cups all-purpose flour + extra for dusting
- 2 tbsp coconut oil, plus extra for greasing the dough
- 1 cup warm water
- 1/2 tbsp baking powder
- 1 package instant dry yeast
- 2 tbsp cane sugar
For the fillings
- 1 (8 ounce) Package Gardein Beefless Strips
- 2 tsp coconut oil
- 1 cup carrots, ribboned (I used vegetable peeler)
- 1 small cucumber, thinly sliced
- 1/4 cup cashews, chopped
- 1/4 cup cilantro
For the pickled onions
- 1 red onion, sliced thinly
- 1 cup red wine vinegar
- 1 tsp black peppercorns (optional)
These Vegan Beef Bao Buns are fluffy steamed Chinese bread rolls filled with tender, delicious beefless strips, a tangy sauce and fresh, crispy vegetables!

Making your own bao buns from scratch could seem a little daunting! Although after doing quite a bit of research on how traditional bao buns are made + through trial and error I was able to figure out the best, most efficient and easiest way! A few ingredients in the dough, only hands required and a bit of patience and the most delicious, fluffy bao buns are created.

The star of the show has to be the “beef”. Beefless strips from gardein are SO delicious, easy to make and packed with flavor. They have a meaty texture and provide and amazing layer of flavor to the bao buns. They even fooled my friends and family to be real meat…

Vegan Beef Bao Buns
- I bought store bought masa that was ready to go, it just needed a bit of added salt! I purchased from a Mexican market although if you can’t get ready to go masa you could purchase corn masa online…I have used this brand: Corn Masa and followed the directions on the package!
- I made my own beans on the stove. (Use this quik method if you decide to go this route: Stove Top Beans. You can also feel free to buy canned beans and mash your self and add some spices or you could buy refried beans in a can.
For the tlakoyos
- Divide the dough into 10 pieces and cover with a wet cloth or napkin. Heat a griddle/ “comal” over medium heat.
- Grab one of the dough pieces & roll between your hands. Place on the sheet of plastic and pat with your hands to form a thick circle.
- Spoon about 1 tablespoon of the beans in the center of the circle.
- Fold the circle to seal the edges, forming a half moon/empanada shape. Then, with your two hands, hold the Tlacoyo and gently press the ends to form the pointy tips on each side.
- Place the Tlacoyo in the already hot griddle and cook each side for about 2-3 minutes, depending on the thickness. You can add a small amount of oil or if your using a non stick pan you can omit it.
For the cashew crema
- In a blender place all cashew cream sauce ingredients and blend until smooth.
For the guacamole
- Mash avocados with a large fork then add all the ingredients. Taste and add more of whatever you feel is necessary.
- Griddle or comal
- Blender or food processor
- Mixing bowl
Makes 10
- 1 cup refried beans
- 2 lbs corn masa
- 1 tbsp salt
- Pickled onions
For the guacamole
- 2 ripe avocados
- 1/4 yellow onion, diced small
- 1 large bunch cilantro, chopped
- 1 tsp garlic powder
- 1 tsp salt
- 1/2 tsp pepper
- 1 jalapeño (optional)
- Juice of 2-3 limes
For the cashew cream
- 1/2 cup raw cashews (soaked for 2 hours)
- 1/2 juice of lemon
- 1/4 cup water
- 1 tsp garlic powder
- 2 tbsp cup nutritional yeast
These Vegan Tlakoyos are delicious corn cakes filled with beans! I fell in love with this dish during my time in Mexico City and hope you love them too!

They are pretty straightforward and easy to make. Only require a few ingredients and the toppings are quite versatile and filling and topping options are endless. I had some in Mexico City that were topped with Nopales and lentil salad! So get creative with the toppings.

Roll into a (golf sized) ball, flatten, add beans to center, fold in half, shape into a tlakoyo & flatten a bit!

Vegan Tlakoyos
- Before you begin this recipe, soak your raw cashews. If you have the time, soak them in filtered water for at least 4 hours over night OR you can soak in hot water for 20 minutes.
- Add 1/2 cup almonds to blender or food processor and pulse until fine, close to flour consistency. Then add remaining 1/2 cup almonds, 6 pitted dates, 2 tbsp melted coconut oil, 2 tbsp cacao nibs and a pinch of salt to a food processor or high-powered blender and pulse, it should come together into a sticky dough.
- Grease a 6” springform pan with melted coconut oil (for easy removal). Remove crust from food processor and press into the greased pan, evenly pressing down and pushing the crust to the sides as well. Set aside!
- In your blender, combine 2 cups (soaked) cashews, 3/4 cup coconut milk (shake coconut milk can before opening), 2 tbsp melted coconut oil, 4 tbsp maple syrup, 1 tbsp matcha powder, 1 vanilla bean (slice in half length wise and scrape the inside), pinch on salt. Blend until smooth. Taste and adjust sweetness by adding more maple syrup if needed.
- Pour the matcha filling on top of the crust and spread with a spoon or spatula creating a smooth top. Place In freezer for 4 hours or over night.
- Once the cheesecake has sat in the freezer for at least 4 hours prepare the chocolate ganache. Place chopped chocolate in a microwave safe bowl. Place in microwave and heat for about 1 minute to start with. Remove from the microwave and stir. Repeat heating at shorter intervals, 15 to 20 seconds, stirring in between, until the chocolate is completely melted and has a smooth consistency. Add coconut milk and quickly stir in with a whisk.
- Run a sharp knife along the edge of the pan and cheesecake and then release cake from pan. Spread the chocolate ganache on top of the cheesecake. Set aside for the chocolate to Harden… The frozen cheesecake will harden the chocolate quite fast so no need to place in the freezer!
- Top with fresh berries and an optional dust of matcha. Let sit for 15 minutes (just to soften up a bit) and enjoy! * You can store in the fridge for 4 days or in freezer for a longer time.
- Blender or food processor
- Springform pan
Serves 8
For the crust
- 1 cup raw almonds
- 6 medjool dates (pitted)
- 2 tbsp melted coconut oil
- 2 tbsp cacao nibs
- Pinch of salt
For the matcha filling
- 2 cups raw cashews (soaked)
- 3/4 cup coconut milk (from a can)
- 1 tbsp Aiya Cooking Grade Matcha
- 1 vanilla bean
- pinch of salt
For the chocolate ganache
- 3.5 ounces vegan dark chocolate
- 3 tbsp coconut milk (from a can)
Optional toppings
- Raspberries
- Strawberries
- Blueberries
- Matcha (for light dusting)
This Vegan Matcha Cheesecake is creamy, sweet, satisfying and has that perfect matcha flavor in every bite!

My love for matcha will always grow. There are endless ways to use matcha, especially in desserts. This cheesecake is creamy, sweet, satisfying and has that perfect matcha flavor every matcha lover adores. Dark chocolate and berries are a matcha made in heaven with matcha so it was a no brainer when I found my self decorating the most perfect little cheesecake. Feel free to enjoy the matcha cheesecake as is (without the berries and chocolate) because it is so special and delicious on its own…Although I highly recommend.

Lets talk MATCHA! I used Cooking Grade Matcha from Aiya Matcha. All of Aiya’s Matcha is produced in the Nisho region of Aichi prefecture, Japan, where the finest Matcha has been grown for over 800 years… and the cooking grade matcha in particular is perfect for dessert recipes because it has a stronger tea flavor than a drinking grade, allowing the Matcha flavor to shine through when mixed with other ingredients.

Vegan Matcha Cheesecake
- Preheat oven to 375F. Begin by making your Italian bread crumbs by combining bread crumbs with dried parsley, black pepper, salt, garlic powder, onion powder and dried oregano and mix until well combined.
- Cut each cauliflower in half then cut them into 1-inch thick slices. You should end up with 4 cauliflower stakes and some florets that you can bread and bake too!
- In a large wide bowl, combine 2 tbsp vegan egg powder with 3/4 cup cold water. Whisk until well combined.
- In another wide bowl, add flour and set aside.
- Dredge each cauliflower in the flour and tap off excess, then dip in the vegan egg mixture and let excess drip off, then dredge on both sides in the bread crumbs.
- Place breaded cauliflower on a baking sheet lined with parchment paper and baking for 20 minutes. After the 20 minutes carefully take out of oven and spoon marinara sauce over each cauliflower and a sprinkle or thin slice of vegan mozzarella. Bake for an additional 10 minutes.
- Remove from oven, sprinkle over vegan parm and enjoy hot!
- 2 large wide bowls
- Baking sheet
Serves 4
- 1 large cauliflower
- 2 cups marinara sauce
- 1 cup all purpose flour (gluten free optional)
- Vegan mozzarella cheese
- Vegan parmesan cheese (or homemade parm)
For the vegan egg mixture
- 2 tbsp vegan egg
- 3/4 cold water
- Italian bread crumbs (gluten free optional)
- 3/4 cup organic whole wheat bread crumbs (gluten free optional)
- 1/2 teaspoon salt
- 1/2 teaspoon dried parsley
- 1/2 teaspoon black pepper
- 1/2 teaspoon garlic powder
- 1/4 teaspoon onion powder
- 1/4 teaspoon dried oregano
This Vegan Cauliflower Parm is my vegan take on the classic chicken parmesan! It's crispy, healthy, filling and so delicious.

Vegan Cauliflower Parm
- Preheat oven at 400F.
- Soak raw cashews in hot water for at least 20 minutes.
- Chop yukon gold potatoes and place them on a baking sheet lined with parchment paper. Season with salt and pepper and place in preheated oven for 35 minutes or until potatoes are slightly browned.
- Meanwhile place soaked cashews, juice of 2 lemons, white wine vinegar, dijon mustard, salt and water in a high-speed blender & blend until smooth. Set aside until ready to use.
- Finely dice celery and onion. Mince chives and set aside.
- Once potatoes are out of the oven let cool for 10 minutes.
- Then place potatoes in a large mixing bowl along with the vegan mayo, celery, onion, sweet relish, garlic powder, chives, dijon mustard and pepper.
- Serve right away or place in fridge for an hour to chill. Top off with chives to garnish!
- Baking sheet
- Blender or food processor
- Large mixing bowl
Serves 6
- 3 lb yukon gold potatoes
- 1 cup chopped celery
- 1/2 cup chopped onion
- 1/2 cup organic sweet relish
- 1 tsp garlic powder
- 1 tbsp dijon mustard
- 1/4 tsp pepper
- 1 bunch chives
For the vegan mayo
- Juice of 2 lemons
- 1 tsp white wine vinegar
- 1/2 tsp dijon mustard
- 1/2 tsp salt
- 1 cup raw (soaked) cashews
- 1/2 cup water
Potato salad was one of my favorite summer dishes when I was a kid! When figuring out how to “veganize” it I couldn’t believe that the base was MAYO! I wanted to avoid using vegan mayo and instead make a healthy, lighter and less processed potato salad. I am SO happy with how this came out. Made with whole foods, oil free and SO SATISFYING!


Vegan Potato Salad
- In a large bowl, place the almond milk and 2 tbsp vegan butter, place in the microwave and heat for 30 seconds or until warm and vegan butter melted. Remove from heat and let cool. (It should be warm, not hot!) Transfer mixture to a large mixing bowl and sprinkle on yeast but do not stir. Let mixture sit for 10 minutes. Then add 1 Tbsp sugar and the salt and stir.
- Next add in flour 1/2 cup at a time, stirring as you go. You can then use your hands as it will get difficult to stir because it will become thick! Transfer the dough to a floured surface and kneed for 30 seconds to a minute. Add your dough ball back into your mixing bowl and cover with plastic wrap and set in a warm place to rise for about 1 hour, or until doubled in size!
- In a small bowl combine 3 tbsp cane and 1 tbsp matcha and mix until well combined.
- On a lightly floured surface, roll out the dough into a thin rectangle. Brush with 2 tbsp melted vegan butter. Then sprinkle over your sugar and matcha mixture,
- Starting at one end, tightly roll up the dough and situate seam side down. Then with a serrated knife cut the dough into 1.5 – 2 inch sections and position in a well-buttered 8×8-inch square or comparable sized round pan (you should have about 8 rolls). Brush with remaining 1 tbsp vegan butter (melted) and cover with plastic wrap. Set on top of the oven to let rise for 15 minutes & preheat oven to 350F.
- Once the oven is hot, bake rolls for 25 minutes or until slightly golden brown. Meanwhile make your glaze by combining the powdered sugar, vanilla extract and almond milk, whisking together and setting aside until ready to us. If glaze is too thick add 1/2-1 tbsp almond milk & if too thin add a little more powdered sugar.
- Once rolls are baked, Let cool for 5 minutes, drizzle over glaze and then serve immediately. ENJOY!
- 2 large bowls
- Small bowl
Makes 8 Rolls
- 3/4 cup unsweetened almond milk
- 1 packet instant (or rapid-rise) yeast
- 4 tbsp vegan butter
- 2 1/4 cups unbleached all-purpose flour
- 1 tbsp Aiya matcha
- 4 tbsp cane sugar
- 1 cups organic powdered sugar
- 1-2 tablespoons unsweetened almond milk
- 1/2 tbsp vanilla extract
- Pinch of salt
These Vegan Vanilla Matcha Rolls are a twist on the classic cinnamon roll! These rolls are perfect for a weekend breakfast treat or as dessert!

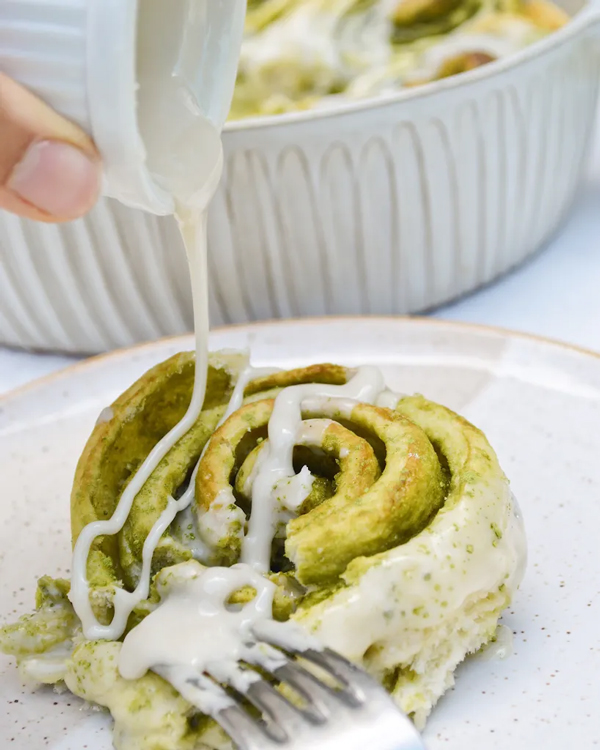
Vegan Vanilla Matcha Rolls
- Preheat oven to 375F.
- Soak cashews in hot water for 15 minutes.
- Cook noodles according to directions on the package.
- Remove seeds from bell pepper and cut into 4 pieces, place on baking sheet lined with parchment paper and bake in preheated oven for 10 minutes.
- Once bell pepper is out of the oven (leave oven on for the mac n cheese) place it in a high speed blender along with soaked cashews, cannellini beans, miso paste, nutritional yeast, macadamia milk, lemon juice, liquid smoke, salt & pepper. Blend for 1-2 minutes or until smooth.
- Place the macaroni noodles in a baking dish. Pour all of the sauce over the noodles and mix until each noodle is coated. Place in preheated oven for 15 minutes)
- Meanwhile place your four slices of bread in a toaster oven until golden and crisp. Place toast, nutritional yeast, dried oregano, garlic powder & salt in a food processor and pulse until bread crumbs begin to form.
- Once the mac n cheese has been in the oven for 15 minutes, take out of the oven and sprinkle over the bread crumbs. Place back into the oven for 10 minutes.
- Remove from oven and enjoy hot! Sprinkle over thinly slices chives for garnish.

- Baking sheet
- Blender or food prcessor
- Baking dish
Serves 4-6
Gluten Free and Oil Free
- 12 ounces macaroni noodles (I used brown rice noodles)
For the sauce
- 1 cup raw cashews
- 1 (15 ounce) can cannellini beans
- 1 red bell pepper
- 1 tbsp miso paste
- 1/2 cup nutritional yeast
- 1 cup unsweetened macadamia milk (I used milkadamia)
- Juice of 1 lemon
- 1 tsp liquid smoke (optional but highly recommend! gives a smokey “cheesy” flavor)
- 1/2 tsp salt
- 1/4 tsp pepper
For the homemade gluten free bread crumbs
Feel free to use store bought
- 4 slices gluten free bread (I used follow your heart brioche loaf)
- 3 tbsp nutritional yeast
- 1 tsp garlic powder
- 1 tsp dried oregano
- 1/2 tsp salt
Optional topping
- Fresh Chives
The Best Vegan Mac n' Cheese! I am SO ecstatic to share this recipe with you all. This recipe will stick for a very long time, it's that good!
I have made a TON of vegan Mac n cheese variations in the span of 3 years. Each time they’re good, but clearly not good ENOUGH because I always find myself going back to square one. This time I got it right & I am SO ecstatic to share this recipe with you all. I now officially have an incredible Mac n cheese recipe that I will very likely stick to for a long time! It is creamy, smokey, cheesy, comforting… All the elements you need in a good Mac n cheese. It also happens to be gluten free, made with nourishing ingredients, so yes!!! Feel good about enjoying this macaroni n cheese!


The Best Vegan Mac n' Cheese | GF
- Bring a small pot of water to a boil. Place your raw almonds into the boiling water. Let boil for 2 minutes.
- Drain the almonds immediately in a colander or strainer and rinse them with cold water to cool them. Blot the almonds dry with a paper towel.
- Use your fingers to gently squeeze the almonds and loosen the skin from them. Set skinless almonds in a bowl and set aside.
- Remove tofu from package and wrap in a clean kitchen towel or paper towel and squeeze for 20 seconds to allow for excess water to strain.
- In a food processor or high speed blender combine tofu, blanched almonds, nutritional yeast, unsweetened almond milk, garlic powder, onion powder, salt & pepper. Blend for 1-2 minutes or until there is no chunks. Mixture will look lumpy and that is okay! Add more almond milk if needed.
- Rinse the artichoke hearts and then roughly chop. In the same pan you cooked the spinach in sauté the artichoke for 4 minutes. Add half the amount of artichokes to the food processor and pulse into the tofu almond mixture for 30 seconds.
- In a small pan cook chopped spinach with 1 tbsp on water for 1 minute or until spinach is wilted down.
- Scoop out the mixture from food processor into a large bowl and add spinach! Mix with a spoon, taste mixture and add any extra salt or seasonings if needed.
- Prepare your baguette in your preferred way (I sliced mine, spread a little vegan butter on top and toasted them), chop your veggies of choice and enjoy! You can eat the dip as is your warm it up in the oven for 15 -20 minutes at 375F.

- Small pot
- Strainer
- Blender or food processor
- Pan
Serves 8-10
- 1 (14 ounce) package of firm tofu
- 1 cup raw almonds
- 1/2 tsp salt
- 1/4 cup nutritional yeast
- 1/2 tbsp garlic powder
- 1/2 tbsp onion powder
- 1/4 tsp pepper
- 3 cups chopped spinach
- 1/2 cup unsweetened (plain) almond milk
- 3 (14 ounce can) artichoke hearts, in water
For dipping
- Baguette
- crackers (I like Mary’s crackers)
- cucumber
- carrot
- radish
- bell pepper
This Healthy Vegan Artichoke Dip is loaded with tasty ingredients and is a healthier alternative than the traditional!

Healthy Vegan Artichoke Dip
- Preheat oven to 400F.
- Peel then cut sweet potatoes into fries, and cut washed cauliflower into small florets. (Reserve half of the cut cauliflower for the cauliflower rice.)
- On a large baking sheet lined with parchment paper, line up sweet potato fries and spread out cauliflower on the same baking sheet (or another one if you need more room.)
- In a small bowl combine 1 tsp paprika, 1 tsp garlic powder and a pinch of salt. Mix with a spoon and then sprinkle this mixture over the cauliflower.
- Place the cauliflower and sweet potatoes in the preheated oven an bake for 30 minutes.
- Meanwhile cook quinoa according the direction of the package. This should take a total of 20-25 minutes. Place the reserved cut cauliflower in a food processor and pulse until rice texture is reached. Heat a large pan over medium heat. Add cauliflower rice to the pan along with 2 tbsp of water. Cook for 5 minutes, add a pinch of salt and pepper then turn off heat.
- Slice tofu into strips and place in a shallow bowl. Add to tbsp soy sauce, making sure each piece of tofu has soaked up the soy sauce. On a baking sheet lined with parchment paper lay out the tofu and asparagus. Once there is 15 minutes left for the cauliflower and sweet potatoes to bake, place in oven and cook for 15 minutes.
- Once the quinoa is cooked and your cauliflower rice is ready, in a large bowl combine quinoa, cauliflower rice, 4 tbsp hummus, 1 tbsp rice vinegar and a 1/2 tsp salt. Mix well to combine.
- Lay out a large piece of plastic wrap, then lay seaweed paper over it with rough side facing up, apply rice to nori sheet covering all edges. Apply rice 1/2″ thick.
- Layer veggies on bottom of nori & roll carefully with the plastic wrap, tightening with hands as you roll. Slice with a sharp knife. Season with sesame seeds if desired & Use Soy Sauce dipping and enjoy!

- Baking sheet
- Small bowl
- Shallow bowl
- Large bowl
Serves 4
For the cauliflower rice & quinoa
- 1 cup uncooked quinoa (I used tri-colored but any kind would work perfect)
- 1/2 cauliflower (reserve other half for fillings)
- 4 tbsp store bought hummus (plain)
- 1 tbsp rice vinegar
- 1/2 tsp salt
For the fillings
- 1/2 cauliflower
- 2 avocados
- Asparagus
- 2 sweet potatoes
- 1/2 tofu block, extra firm & high protein if possible
- 2 tbsp soy sauce or tamari
- 1 tsp paprika
- 1 tsp garlic powder
Other ingredients
- Seaweed sheets (6-8)
- Soy sauce or tamari (for dipping)
- Sesame seeds
This Cauliflower Rice & Quinoa Sushi is a healthier sushi alternative, eliminating the white rice! I absolutely love sushi. My husband Chancy & I make it quite frequently because it is delicious and actually quite easy to make! Recently we have been trying to clean up our plant based diet with eliminating things such as white rice and instead replacing it with QUINOA. I combined quinoa and some left over cauliflower rice I had in the fridge and it was PERFECT in the sushi. I added hummus as the secret ingredient that way the quinoa and cauliflower would stick together and it also added great texture and flavor. I think I really prefer THIS over the classic sushi rice.

The great thing about making sushi at home is how creative you can get with the fillings! Really add any fillings your heart desires. I love the combination of baked veggies with avocado and tofu. If I could recommend my top two favorites in the sushi I would have to say BAKED SEASONED CAULIFLOWER (new game changer) & AVOCADO (classic must!).


Cauliflower Rice & Quinoa Sushi
- Begin by cooking brown rice (this is optional to serve with your stuffed eggplant! Although I really recommend to make a complete meal) using the ratio of 1 cup brown rice + 1 3/4 cup water or use your preferred method.
- Preheat oven to 375F.
- Finely dice onion, garlic and tomatoes.
- Heat a large pan over medium/high heat combing onions and garlic with 1-2 tbsp of water to prevent sticking. Sauté for 3 minutes and season with a pinch of salt and pepper.
- Add the tomatoes and cook for an additional 10 minutes.
- Prepare the eggplants by scoring out a side of the eggplant and using a spoon to scoop out most of the inside of the eggplant, finely chop the inside of the eggplant and add to the tomato mixture
- Once the tomatoes have been cooked for 10 minutes, add tomato sauce, chopped artichoke, chopped spinach and cook for 2 minutes.
- Lastly add a handful of roughly chopped basil and heat through for 1 minute. Taste filling and adjust seasonings as needed. Turn off heat and set filling aside until ready to assemble.
- In a large skillet with a lid, over medium heat add 1/4 cup water and place the eggplant on the skillet and cover with a lid. Cook for 7 minutes, rotating the eggplants every minute and adding 1-2 tbsp of water as needed. Make sure to cover with lid.
- Once the eggplants are tender and ready, carefully transfer them each to a baking dish and stuff the eggplants with the stuffing. If there is left over stuffing spoon the remainder into the baking dish if there is room (see photo above as a reference.)
- Place in the oven for 35 minutes. In the last 10 minutes carefully take out and top with halved cherry tomatoes (optional!).
- Once taken out of the oven top off with avocado, a sprinkle of chopped basil and serve with your brown rice!
- Large pan
- Baking dish
Serves 2
- 6 small tomatoes (3 cups tomatoes)
- 1 small handful fresh basil
- 2 large eggplants or 4 small
- 1/2 large yellow onion
- 3 garlic cloves, crushed
- 2 cups spinach, uncooked
- 1 (8 ounce) can organic tomato sauce
- 1 (14 ounce) can artichoke hearts, in water
- 1/2 tsp salt
- 1/4 tsp pepper
Optional toppings
- Fresh basil
- avocado
- Cherry tomatoes
- 1-2 cups cooked brown rice (we enjoyed our stuffed eggplant with brown rice)
This Vegan Stuffed Eggplant recipe is so healthy yet so delicious! It's a comforting and filling meal packed with veggies.
I absolutely LOVE eggplant. It has to be one of my most favorite vegetables. I think most people love it too but only if it is cooked right! Usually restaurant eggplant is so delicious because extra time & love is thrown into the cooking of the eggplant. This recipe is SO healthy yet super delicious … My boyfriend Chancy loved it so much, he didn’t even realize he ate an entire eggplant for dinner!


Vegan Stuffed Eggplant
- Preheat oven to 375F.
- Begin by making the smokey tempeh bacon. Combine 1/4 tsp liquid smoke, 3 tbsp tamari and 1 tbsp maple syrup. Whisk together in a shallow large bowl and toss in sliced tempeh. Make sure to coat each piece of tempeh in the sauce and let sit for 5 minutes.
- Next make vegan sour cream! (If you’re using store bought, skip this step!) Begin by discarding the water from the cashews. Combine all sour cream ingredients in a high speed blender and blend for 2 minutes or until smooth and creamy. Scoop out into a jar until read to use. (You will have left over sour cream but you will be so happy! It is delicious on nearly anything especially on baked potatoes!)
- Once the tempeh has sat for 5 minutes, lay each piece of tempeh out on a baking sheet lined with parchment paper and place in oven for 20 minutes!
- Meanwhile finish making the ranch dressing by combining all ingredients into a medium size bowl and whisking together until there are no lump and dressing is smooth.
- Once the tempeh is out of the oven and your salad ingredients are prepared and ready, assemble your salad to your liking and enjoy!
- Large shallow bowl
- Blender or food processor
- Baking sheet
- Medium bowl
Makes 4 side salads or 2 full salads
- 2 heads romaine lettuce, chopped
- 1 cup cherry tomatoes, halved
- 1 cup cooked black beans (either from a can or homemade)
- 1 cup frozen organic corn
- 1-2 avocados
For the smokey tempeh “bacon”
- 8 ounces tempeh, sliced
- 1/4 tsp liquid smoke
- 3 tbsp tamari or soy sauce
- 1 tbsp maple syrup
For the ranch dressing
- 1/2 cup almond milk
- 1/4 cup tahini
- 4 tbsp vegan sour cream (Store bought or refer to sour cream recipe below)
- 3 tbsp cilantro, finely chopped
- 2 tbsp chives, finely chopped
- 2 tsp white wine vinegar
- Juice of 1 lemon
- 2 garlic cloves, finely chopped or crushed
- 1 tsp salt
- 1/4 tsp black pepper
For the vegan sour Cream
- 1/2 cup raw cashews, soaked in hot water for 10 minutes
- 1/4 cup unsweetened almond milk
- 1 tsp rice vinegar
- Juice of 1 lemon
- 1/2 tsp garlic powder
- 1/4 tsp sea salt
- 1/4 tsp black pepper
This Vegan Cobb Salad is so simple and SO GOOD! Trust me, you will want it a couple times a week! A tangy, healthy ranch dressing, smokey tempeh “bacon”, fresh crisp veg , roasted corn and hearty black beans. Let's jump right into this recipe so that you could actually CRAVE salads for dinner.


Vegan Cobb Salad
OOPS
Looks like there are no recipes to show.
Maybe try a different keyword? :)


