- Place all ingredients in a food processor or blender. Pulse until a powder is formed. Store in a jar in the fridge for up to 2 weeks! Enjoy on pasta, pizza or any meal of choice!

- Blender or food processor
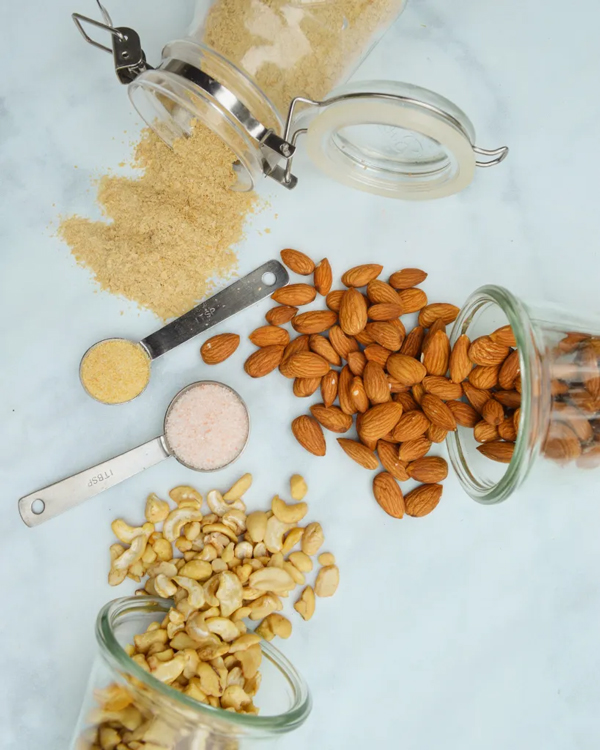
5 Minute Recipe
- 1/2 cup nutritional yeast
- 1/2 cup raw almonds
- 1/2 cup raw cashews
- 1 tsp salt
- 1/2 tsp garlic powder
This Vegan Parmesan Cheese is so addicted! Stop putting real cheese all over your pasta and get addicted to this stuff instead!
It is perfect on pasta, pizza, salads and just about any thing you would put regular cheese on. You only need a few ingredients and could store this in your fridge and have it through out the week!

Vegan Parmesan Cheese
- Preheat over to 400F.
- Begin by rinsing your jackfruit under cold water and remove the seeds. If the core is tough, remove that too! (Refer to the photo of a jackfruit pod above).
- Using your hands or a fork, shred the jackfruit. It should look really similar to shredded chicken. Set aside until ready to use.
- Dice your onion into small pieces and saute in a large pan over medium heat for 3 minutes.
- Add the shredded jackfruit and barbacoa (or salsa) to the onions and saute for 15 minutes. Taste and add salt and pepper as needed.
- Add the frozen corn and cook for an additional 5 minutes. Turn off heat and set aside until ready to use.
- Line a baking sheet with parchment paper and set to the side.
- Heat a non stick pan over medium to high heat. Grab a corn tortilla and wet the tortilla with filtered water then place it directly on to the pan (This ensures for a really soft and bendable tortillas). Cook the tortilla for 10 seconds on each side. It is important not to cook the tortillas until crispy because it will be harder to roll. After you take the tortilla off the pan immediately place a spoonful of jackfruit mixture and tightly yet gently roll, placing the taquito seam side down.
- Repeat step 7 until you have created all your taquitos.
- Place the taquitos in the preheated oven and bake for 20-25 minutes or until slightly golden brown and crisp.
- Meanwhile make your cashew sour cream by placing soaked raw cashews, water, nutritional yeast, salt, pepper, lemon juice and garlic powder. Blend until smooth and creamy. Pour into a small bowl and set aside until ready to use.
- Dice onion, tomato, jalapeno and cilantro finely. Cut the avocados in half and scoop out the flesh of the avocado into a medium sized bowl. Mash with a fork and then add all the ingredients. Mix well and adjust seasonings as needed.
- Once the taquitos are done and out of the oven, serve with a generous spoonful of guacamole and a drizzle of cashew sour cream and enjoy!
- 2 large pans
- Baking sheet
- Blender or food processor
Makes 10 Taquitos
- 1/2 white onion
- 1 (20 ounce) can jackfruit (in brine or water)
- 1/2 cup frozen corn
- 8 ounces barbacoa seasoning sauce (this is the one I used) or use any tomato based salsa (avoid chunky salsa)
- 1 tsp salt
- 1/4 tsp pepper
- 10 corn tortillas
For the guacamole
- 2 avocados
- 1/2 jalapeño (optional)
- 1/4 cup cilantro, chopped
- 1 small tomato
- 1/4 white onion
- 1 tsp salt
- 1/4 tsp pepper
- juice of 1 lime
For the cashew sour cream
- 1 cup raw cashews (soaked for 2 hours)
- 1/2 cup water
- 2 tbsp nutritional yeast
- 1/2 tsp salt
- 1/4 tsp pepper
- juice of 1 lemon or lime
- 1/2 tsp garlic powder
Taquitos were my childhood obsession! Of course I had to make a vegan version that are crunch, flavorful and SO GOOD!

In this recipe we use jackfruit! Jackfruit was sent by the vegan gods to replace chicken or beef in recipes that we all know and love. I want to breakdown jackfruit for anyone who is not familiar with it. Jackfruit can come fresh, in a can with syrup or in a can with water/ brine. Fresh jackfruit is incredible and taste like juicy fruit gum. Great for snacking but you don’t want it for this type of dish. You want to get canned jackfruit in either water OR brine. Absolutely AVOID the canned jackfruit in syrup for this recipe. When it comes to a jackfruit pod you have to remove the seeds and if the core of the jackfruit pod is tough remove that too! Then you’re left with spreadable jackfruit pods that make for great mock chicken. Below is a photo of a jackfruit pod.


These taquitos take me back to my childhood! They’re crunchy, flavorful and SO delicious. I cant wait for you all to try them.

Vegan Taquitos
- Remove the wrapper from each tomatillo and wash the tomatillos well. Cut onion into 1/4 pieces. On large skillet over medium to high heat place tomatillos, onion, 2 garlic and an optional serrano pepper.
- Grill for for 5-7 minutes until there is a char on the tomatillos, onion, serrano and garlic cloves. (Refer to photo above).
- Turn off heat and place ingredients into a high speed blender with 1 tsp salt, 1 tbsp cane sugar and cilantro. Blend the sauce until smooth.
- Pour sauce into a bowl and set aside until ready to use.
- Slice onion thinly and cook in a large skillet for 5-6 minutes until the onions begin to caramelize. Add 1-2 tbsp water every minute to help avoid the onions from sticking. Add a pinch of salt and pepper.
- Cut corn tortillas into triangles. Add the corn tortillas to the onions and then pour over the green tomatillo sauce. Reserve 1/2 cup of the sauce.
- Mix and let cook for 5-7 minutes.
- Add vegan cheese shreds over the top and cover with a lid and turn down heat to low. Let the cheese melt for 3-5 minutes.
- In a blender place all cashew cream sauce ingredients and blend until smooth.
- Turn off heat and once ready to serve drizzle over your cashew cream sauce and spoon over an extra tomatillo salsa desired! Enjoy.
- Large skillet
- Blender or food processor
- Medium/small bowl
Serves 4
- 12 chopped corn tortillas
- 1 onion
- 1 tsp salt
- 1/2 tsp pepper
- 1/2 – 1 cup shredded vegan cheese (I used this one & shredded it myself!)
For the sauce
- 1/2 yellow onion
- 2 garlic cloves
- 12 tomatillos
- 1/2 serrano pepper
- 1 bunch cilantro
- 1 tsp salt
- 1 tbsp cane sugar
For the cashew cream sauce
- 1/2 cup raw cashews (soaked for 2 hours)
- 1/2 juice of lemon
- 1/4 cup water
- 1 tsp garlic powder
- 2 tbsp cup nutritional yeast
I grew up eating chilaquiles on weekends and these Vegan Green Chilaquiles are everything you want in your weekend breakfast and more!
This recipe skips out on oil and are made with corn tortillas and pure plants. Traditionally chilaquiles are either made with red tomatoes or green ones. I prefer green ones because tomatillos (green tomatoes) are SO GOOD. They’re slightly tart and make for a great salsa.


I can’t wait for you guys to make these super easy, delicious chilaquiles.

Vegan Green Chilaquiles
- Make brown rice according to the directions on package or use the ratio of 1 cup uncooked brown rice + 1 1/2 cups water.
- Finely dice onion, garlic and mushrooms.
- In a large pan over medium heat, saute onion and garlic for 2 minutes or until fragrant. I water saute, meaning I add 1-2 tbsp of water throughout the cooking process to prevent the onions and garlic from sticking to the pan.
- Next add the mushrooms to the onions and garlic and saute for 6-7 minutes or until mushrooms are fully cooked. Season with salt and pepper then turn off heat. Set aside until ready to use.
- Place, almonds, paprika, cumin, salt and pepper in a food processor and process until fine.
- Pour the almond mixture into a bowl and combine with the bread crumbs.
- Next combine black beans, tomato puree and bbq sauce in the food processor. Process for 30 seconds until relatively smooth. It is ok if there is some whole beans in the mixture.
- In a large bowl combine all the ingredients…Mushroom + onion mixture, cooked brown rice, bread crumb + almond mixture, and bean puree. Mix all together until well combined. Taste and adjust seasonings as needed. Adding more salt if needed.
- Form the balls using 1 heaping tbsp of mixture per ball. Should make 20-22 balls. Combine the meatballs in a large pan with marinara sauce and heat for 10 minutes. Serve with spaghetti or in a meat ball sub!
Cant wait to see what you guys do with these little balls of deliciousness!

Makes 22 Meatballs
- 1 small onion
- 2 cloves garlic
- 2 cups portobello mushroom, chopped
- 1/2 cup raw almonds
- 1 cup bread crumbs (gluten free optional)
- 1 tbsp tomato paste
- 3 tbsp bbq sauce
- 1 cup cooked brown rice
- 1 (15 ounce) can black beans
- 1/2 tsp paprika
- 1/4 tsp cumin
- 1/4 tsp pepper
- 1 tsp salt
These Vegan Meatballs are made with just a handful of simple ingredients you probably already have on hand! These meatballs are flavorful, healthy & hearty!
I grew up loving meatballs! Actually quite surprising because I wasn’t the biggest meat eater, although the one thing I would never turn down is a meat ball sub or spaghetti and meat balls. Just a handful of a few simple ingredients and you have yourself flavorful, healthy & hearty “meat” balls!


Chancy and I couldn’t help but pick up a fresh loaf of sourdough bread from the farmers market this weekend and made some meatball subs! They were incredibly delicious.

Vegan Meatballs
Skip steps 7-12 if you’re using store bought gyoza wrappers.
- Sift flour and salt into a large bowl. Make a well in the center of the flour and pour hot water into the center. Mix with a wooden spoon and then begin to knead with hands. Knead for 1 minute. If the dough is too sticky add flour. If it seems to be too dry add 1-2 tbsp of hot water.
- Wrap the dough in plastic wrap and let sit for 45 minutes.
- Meanwhile make your filling. Chop the all your veggies into VERY small pieces. The smaller, the better.
- To a large pan on medium heat, add onion and garlic and saute for 2 minutes. Add 1 tbsp of soy sauce and mix.
- Add the mushrooms, carrot and cabbage + 1 more tbsp of soy sauce and 1 tbsp of coconut aminos and saute for 5 minutes or until cooked all the way. Taste the filling and season with salt and pepper Turn off heat and let cool.
- Once your dough has sat for one hour, unwrap the dough. Sprinkle a little flour on the work surface and cut each log crosswise into about 12 pieces (may vary depending on the log length and width). Since we’ll be using a cookie cutter, don’t worry if each piece of dough has slightly different size.
- Cover the dough with damp kitchen towel at all time to prevent from drying. Form each piece of dough into a ball shape.
- Press the ball onto the work surface.
- Using a rolling pin, roll out the dough, but DO NOT roll out (flatten) the TOP and BOTTOM edge. This is a trick to make a nice round shape.
- Rotate the dough 90 degrees and repeat rolling the dough to make a nice round shape. Try to roll out the dough to a thin circle.
- If you want a perfect round shape for your wrappers, press down the 3-inch (8 cm) cookie cutter and remove excess dough. If the dough rolls back, leave it for a few seconds, and cut out. Cover the scraps with the damp towel. Later combine all the scraps as long as they still squish together and haven’t dried out too much. Re-roll the scraps and repeat the process.
- Sprinkle each wrapper with flour and stack the gyoza wrappers.
- When ready to assemble, dry your hands completely (or wrappers will stick). Place a gyoza wrapper on one hand and put 1 teaspoon filling in center of wrapper.
- Dab a little water around the edges of the wrapper.Pick up the four “corners” of the wrapper and pull them in toward the center so the filling can settle into the base & pinch at the top to seal.
- Place a large frying pan over medium-high heat, add 1 teaspoons sesame oil and arrange gyozas in pan. Add 1/4 cup of water to cover bottom of pan, cover with lid and cook on medium-high heat for 3-5 minutes or until translucent, cooked and no liquid is left in pan. Take off lid and cook for another 30–60 seconds for the bottoms to go crunchy. Cook remaining gyoza or freeze them.
- Serve with soy sauce, green onions, chili pepper flakes and sesame seeds.
- Large bowl
- Large pan
- Rolling pin
Makes 35 Gyozas
- Store-bought Gyoza (or wanton) wrappers or refer to recipe below
For the gyoza wrapper
- 2 cups all purpose flour
- 3/4 cup hot water
- 1 tsp salt
For the filling
- 2 cups mushrooms, diced very small
- 1 cup carrot, diced very small
- 2 cups spinach, chopped
- 1 small onion or half a large onion, diced very small
- 4 garlic cloves, crushed
- 2 tbsp soy sauce or tamari
- 1-2 tbsp coconut aminos
- 1/2 tsp salt (if needed)
- 1/4 tsp pepper
Gyozas are Japanese dumplings that I am a super fan of. Chancy and I always buy frozen vegetable gyozas from our local grocery store (Sprouts & Trader Joes). Making these from scratch is actually really simple and fun to make because you can get creative with the fillings! I kept it super simple this time around… I also want to try using vegan beef and other veggies like eggplant or zucchini. Get creative with it! It could be super easy if you buy vegan wanton wrappers…(I used these). You can also make your own, which I also did! Both are great… although for a quicker process, I would recommend using the store bough wanton wrappers.

This recipe is so simple you just throw all the filling ingredients into a pan with some soy sauce & coconut aminos! I like serving them with chili flakes, green onions and sesame seeds for some extra flavor and kick.

Vegan Gyozas
- Preheat oven to 400F and line a baking sheet with parchment paper.
- Prepare chia egg in a small mixing bowl by adding 1 tbsp ground chia + 3 tbsp water and set to the side. (If you only have whole chia seeds place 1/2 a cup of chia seeds in a blender and blend until fine powder is formed…pour into a jar or container and use for future recipes or in smoothies!)
- In a separate large bowl combine flour with baking powder, cane sugar and salt. Mix with a whisk to combine.
- Chop vegan butter (make sure it is room temperature) into small cubes and add to the dry mixture and use a fork to mix into the flour. Mix until there are no large lumps.
- Whisk the almond milk into the chia egg and mix well. Pour the wet mixture into the dry mixture and mix with a wooden spoon. Make sure not to over mix!
- Transfer the dough mixture onto a floured surface and use hands to finish mixing. Add chocolate chips OR chopped blackberries.
- Form the mixture into a rectangle and cut into 6 scones (triangles). Gently transfer the scones to the baking sheet lined with parchment paper.
- Bake for 25 minutes or until fluffy and light golden brown on the edges and top. Let cool slightly before enjoying. Enjoy as is or… Make an icing by combining organic powdered sugar + almond milk in a bowl, whisk together. Make sure scones are fully cooled, flip the scone and dip into the icing. Let sit for 10 minutes to harden and enjoy!
Store leftovers at room temperature in a well-sealed container for up to 3 days.
- Baking sheet
- Small bowl
- Large bowl
Makes 6 large scones or 8 small ones
- 2 cups all purpose flour
- 3/4 cup unsweetened almond milk
- 1/2 tsp salt
- 7 tbsp vegan butter
- 1/2 cup cane sugar
- 1 chia egg (1 tbsp ground chia +3 tbsp water)
- 1 tbsp baking powder
- 1/2 chocolate chips or blackberries
For the optional icing
- 1 cup organic powdered sugar
- 2 tbsp unsweetened almond milk
VEGAN SCONES BABY!
The other day my boyfriend Chancy and I were having a debate… A debate on what pastry was better…a croissant or a scone. I was team Croissant and Chancy is a scone guy. So we took this debate to the Instagram polls and although croissants won (as I knew they would (-; ha!) Chancy would NOT stop talking about how he REALLY wanted a homemade vegan scone. It was a fun challenge for me and I while I do still love a good croissant (and hopefully will come up with a recipe for some soon) I have to say, SCONES ARE INCREDIBLE. I understand Chancy’s love for them.

The great thing about this recipe is that it is so simple you only need 30 minutes! You could also get creative and add different toppings in them. We made chocolate chip & blackberry ones! Blueberry or raspberry would be great too!


Easy Vegan Scones
- Rinse canned chickpeas in a fine mesh strainer, then poor the chickpeas onto a large plate lined with pepper towels. Spread the chickpeas out on the plate and grab another paper towel and put it over the chickpeas, patting on them to dry.
- Add cilantro, onion, and garlic to a food processor. Mix until well processed. Set aside.
- Once the chickpeas are dried, add to the food processor, along with almond meal, salt, pepper & cumin. Mix to combine thoroughly, scraping Down sides as needed. You’re looking for a paste like consistency with only very small bits of chickpeas and herbs.
- Sample a small bit and adjust spices/salt/herbs as needed. Then cover and set in the refrigerator for 1 hour. (If you’re making the flat bread buns skip to the “flat bread” directions below… while you wait for your falafel mixture to sit for an hour.)
- Remove from refrigerator and scoop out 1/2 cup amount of falafel Mixture and gently form into a patty with your hands. Feel free to make them into small patties to make regular falafels. The mixture may feel really wet and sticky but that is OK! it will dry out slightly when you cook them.
- Once your falafel patties are formed, heat a large pan over medium/ medium-high heat. brush each side of the falafel patty with a very thin layer of avocado oil or oil of your choice.
- Then place falafel patties on the pan and cook 2-3 minutes on each side Once the bottom side is browned, flip gently as they can be fragile. Continue until all falafel are cooked.
For the flat bread buns
You can make this into larger traditional sized flat bread…Also the directions below are for a stand mixer but feel free to use your hands instead… JUST MAKE SURE TO KNEED
- Place warm almond milk in the bowl of your stand mixer. Mix in the 2 tablespoons of sugar. Sprinkle yeast over the top of the almond milk. Allow to sit for about 5 minutes or until yeast has expanded in size.
- Turn mixer on to speed 2 (or low) and add melted vegan butter and salt. Add flour a little at a time until you’ve added 3-1/3 cups and mix until well combined. Once the mixture is well combined, continue to run mixer on speed 2 for 5 minutes to knead the dough. Dough should be clinging to dough hook.
- Transfer the dough to a bowl that has been coated with cooking spray or olive oil. Place a dish cloth over the bowl and allow bowl to sit in a warm place for an hour or until doubled in size. Divide dough into 12 equal pieces. Using a rolling pin, roll dough into 4″ circles.
- Heat a pan to medium heat. Brush the top of each dough circle with a small bit of avocado oil (or olive oil) and place the bread circles oil side down onto the grill. When the bottom side is browned, turn over the bread, and grill the other side until golden.
For the assembly
Grab two flat bread buns. Slather on hummus or vegan mayo (I used pesto veganise), Falafel patty, 1-2 slices of tomato, avocado and onion. Enjoy!
Serves 6
For the falafels
- 2 cups garbanzo
- 4 garlic cloves
- 1/4 white onion (3/4 cup roughly chopped)
- 1 bunch cilantro
- 1 tbsp cumin
- 1 tsp Salt
- 1/4 tsp Pepper
- 1/2 cup peas
- 1 cup almond meal
For the flat bread buns
- 3 1/3 cups bread flour
- 1-1/2 cups + 2 tbsp warm unsweetened almond milk
- 2 tablespoons sugar
- 1 package active dry yeast
- 2 tablespoons vegan butter, melted
- 1/2 tsp teaspoons salt
For the toppings
- 1/2 red onion (raw or pickled)
- 1-2 avocados
- 2 tomatoes
- Vegan mayo or hummus (optional)
Falafel burger time! In the month of January we hosted another Blissful Gatherings and this time around it was Mediterranean theme! We made falafels and homemade, fluffy, delicious flat bread! For the dinner we served falafel wraps and they were incredible! The guests loved them. Chancy and I reflected on each dish post blissful gatherings and chancy had the genius idea to make falafel burgers! Then I thought of creating flat bread buns and OMG best collaborative idea to date!

This flat bread is rather simple to make and seriously will blow your mind. The bread is soft, fluffy and just perfection. I am so excited for you guys to try this recipe. It is TO DIE FOR!

Vegan Falafel Burger
- Preheat oven to 375 F.
- Make ricotta filling. Bring a small pot of water to a boil. Place your raw almonds into the boiling water. Let boil for 2 minutes.
- Drain the almonds immediately in a colander or strainer and rinse them with cold water to cool them. Blot the almonds dry with a paper towel. Use your fingers to gently squeeze the almonds and loosen the skin from them. Set skinless almonds in a bowl and set aside.
- Remove tofu from package and wrap in a clean kitchen towel or paper towel and squeeze for 20 seconds to allow for excess water to strain.
- In a food processor or high speed blender combine tofu, blanched almonds, nutritional yeast, unsweetened almond milk, garlic powder, onion powder, salt & pepper. Blend for 1-2 minutes or until there is no chunks. Mixture will look slightly lumpy and that is okay! Add more almond milk if needed.
- In a small pan cook chopped spinach with 1 tbsp on water for 1 minute or until spinach is wilted down.
- Once ricotta mixture is made and spinach is ready, combine the two in a medium size bowl and mix well. Taste mixture and add any extra salt or seasonings if needed.
- Slice mushrooms and zucchini 1/4 inch thin.
- In a large pan on medium heat, combine veggie ground + 2 cups of sauce & cook for 5 minutes, then turn off heat.
- To assemble the lasagna pour 1/2 cup of the marinara sauce on the bottom of your baking dish. Spread evenly. Then lay out a layer of lasagna noodles (see photo above for step by step steps).
- Next, add a thin layer of sauce on top of the noodles followed by the meat sauce. Distribute all of the meat sauce evenly over the noodles. Place another layer of noodles over the meat sauce.
- Add a generous layer of sauce over the noodles and follow it with a generous layer of the ricotta. Leave about 1/2 of ricotta for later. Cover the ricotta layer with noodles then a generous amount of sauce… About 1/2 cup. Next lay out sliced zucchini and mushrooms. Pour a thin layer of sauce over the veggies and then a last layer of noodles.
- Pour the remainder of your sauce over the noodles. Should be about 1 cup of marinara sauce. Lastly dollop the remainder of your ricotta and spread over the marinara sauce.
- Cover the lasagna with aluminum foil and place in preheated oven. Bake for 45-50 minutes or until the lasagna noodles are soft.
- Let lasagna cool for 20 minutes and then serve!

- Small pot
- Strainer or colander
- Blender or food processor
- Small pan
- Large pan
- Baking dish
Serves 10 large slices or 12 small
- 16 ounces Lasagna noodles (oven ready, GF or regular)
- 12 ounces Veggie ground beef (I used the brand Yves or trader joes)
- 2 (26 ounce jars) marinara sauce
- 1 cup mushrooms, chopped ( I used cremini but button works great too)
- 1 zucchini or 1 cup sliced
Ricotta
- 1 (14 ounce) package of firm tofu
- 1 cup raw almonds
- 1 tsp salt
- 4 tbsp nutritional yeast
- 1/2 tbsp garlic powder
- 1/2 tbsp onion powder
- 1/4 tsp pepper
- 3 cups spinach, chopped
- 1/2 cup unsweetened almond milk
Optional Toppings
- chilli flakes
- fresh basil
Seriously who doesn’t love a hearty, comforting lasagna? This is not your typical veggie lasagna… while I do throw some veggies in there, there is also layers of “ground beef” and homemade almond ricotta. We have used my homemade ricotta in the pasta shells and tortellinis! So Yes, this stuff is so delicious and legit. Lasagna is actually one of the easiest things to throw together while still looking like you really tried. So since Valentines day is coming up I suggest you put this on your menu if you plan to cook a dinner for your loved.

A little step by step action…

Vegan Lasagna
- In a medium sized bowl combine 2 cups of water with the raw cashews and set aside until ready to use.
- Preheat oven to 400F.
- On a baking sheet lined with parchment paper lay out chopped squash (you can leave the skin on, its edible, tasty and good for you!) and season with salt and pepper. Place in preheated oven and bake for 35 minutes.
- On a separate baking sheet lined with parchment paper, place halved Brussel sprouts and season with salt and pepper. Once squash has been baking for 15 minutes place brussel sprouts in the oven along with squash and bake for the remainder time (20 minutes).
- Bring a large pot of water to a boil and cook your spaghetti according to the directions on the package.
- Once squash and brussel sprouts are baked, remove from the oven.
- Discard the water from the raw cashews and place the cashews in a high speed blender or food processor along with squash, miso, warm water, garlic powder, nutritional yeast and pepper. Blend until smooth. Add more warm water for desired consistency. Adjust seasonings as needed. More miso for more saltiness!
- Once your pasta is cooked transfer to a large pan and pour the sauce over the spaghetti and cook on low for 3-5 minutes or until well combined.
- When ready to serve top it off with your brussel sprouts, chili pepper flakes, and vegan parm (or nutritional yeast if desired) Enjoy!

- Medium bowl
- Baking sheet
- Large pot
- Blender or food processor
Serves 4-5
- 1 lb spaghetti (I like the brown rice & quinoa spaghetti from trader joes)
- 1 cup brussel sprouts, halved
For the sauce
- 1 Kabocha (about 3 cups chopped)
- 1 small delicata (about 1 cup chopped, optional…sub more kabocha squash)
- 1 (15 ounce) can white beans (I used great northern beans)
- 1/4 cup raw cashews
- 1 1/2 tbsp white miso paste
- 1 1/2 cup warm water
- 1 tsp garlic powder
- 1/4 cup nutritional yeast
- 1/4 tsp pepper
Optional toppings
- Chili pepper flakes
- Vegan parm
Kabocha squash is one of my FAVORITE foods. The best way I could describe it, is like a cross between a pumpkin and a potato. Has a slight starchiness like a potato but is slightly sweet like pumpkin. It is THE BEST squash and why not make a pasta sauce out of it? This pasta sauce is creamy, slightly sweet and has a touch of saltiness from the lovely white miso.

This recipe is pretty straight forward and could be an easy week night recipe! Just throw some veggies in the oven (my favorite way to make veggies) and then blending up a delicious sauce. I threw the sauce over some brown rice & quinoa spaghetti to make it a lighter and gluten free meal! But feel free to pair it with some good ol’ regular spaghetti or pasta noodles of your choice.

Vegan Kabocha Pasta
- Bring water and salt to a boil in a medium saucepan.
- Add couscous, reduce heat to a simmer, and cook, covered, until water is absorbed, about 10 minutes. Remove from heat and let stand, covered, for 2 – 3 minutes. Transfer the couscous to a large bowl and fluff gently with a fork and set aside to cool until ready to assemble the salad.
- Chop persian cucumbers and cherry tomatoes into very small pieces.
- Remove cilantro and mint leaves from stems and mince them both.
- Once couscous is completely cooled add herbs, lemon juice, cucumbers, tomatoes, salt and pepper. Mix well.
- Once ready to serve chop avocado into cubes. Top off the salad with avocado, sesame seeds, a few sprigs of cilantro and a squeeze of lemon or lime juice.
- Store in fridge in a airtight container for up to 4 days.
- Medium saucepan
Serves 8
- 2 cups Israeli couscous (uncooked)
- 2-3 Persian cucumbers, chopped (1 1/2 cups)
- 1 cup cherry tomatoes, chopped
- 1 bunch cilantro
- 1 bunch mint
- 3/4 cup lemon juice (or lime, whichever you prefer)
- 1/2 tsp salt
- 1/4 tsp pepper
- 2 avocados
Optional garnish
- 2 tbsp sesame seeds
- Small handful cilantro
- Limes or lemons
This is probably one of the most straight forward, simple, refreshing & EASY PEASY recipes I have posted yet!


This salad is supper versatile too! feel free to add any other veggies your heart desires. Some of my top suggestions would be bell peppers, carrots & zucchini!

Easy Vegan Israeli Salad
- In a large bowl, place semolina flour. Add warm water and stir to make a stiff dough. Increase water if dough seems too dry (1 tbsp). Although be sure to not add too much water because you don’t want the dough to be sticky.
- Pat the dough into a ball and turn out onto a lightly floured surface. Knead for 10 minutes…Dough will start crumbly and dry and after the 10 minutes of kneading it will become smoother and softer. Cover. Let dough rest for 15 minutes.
- Roll out dough to desired thinness using rolling pin or pasta machine. Work with a 1/4 of the dough at one time. Keep the rest covered, to prevent from drying out.If you’re using the pasta machine, stop at the third or second to last setting. Cut pasta into desired shapes. Or use the spaghetti setting if your pasta machine has one.
- Dust a clean large area with flour and lay our pasta leaving room in between each pasta noodle. let harden for 20- 30 minutes.
- Once the pasta had harden (will not be as hard as store bought pasta but should no longer be super soft to the touch), gently grab the pasta and cook in boiling water for 2 minutes, staring as it cooks! Drain the pasta after the two minutes and serve with your favorite sauce.
- Large bowl
- Rolling pin or pasta machine
Serves 4
- 2 cups semolina flour
- 3/4 cup warm water
Easy Homemade Vegan Pasta! Yes... EASY! Only two ingredients, and one of the ingredients is water!

So if you guys have tried making my homemade “ricotta” & spinach tortellinis you guys know we make fresh pasta dough too. So what I initially did was take that pasta dough and make spaghetti out of it…did it work? Yes. Was I completely satisfied with it… NOPE! Most of you know I aim for perfection when creating recipes for you guys. So I set out to make the perfect homemade pasta… Here is the thing… I LOVE my pasta al dente. So while the pasta dough for the tortellinis work great for that specific recipe, I was still striving for the al dente bite in pasta that I LOVE. Semolina flour was the answer.

Seriously all this recipe needs in semolina flour, just the PERFECT amount of warm water and LOTS of kneading. The most difficult part in this all is the kneading…So Chancy and I usually take turns doing it until the dough is ready to go!

You can get as creative as your heart desires with making the pasta shapes! Stick to classic noodles or try little bow ties!

Can you tell the difference between store bought and homemade? In my opinion YES! So much tastier, easy peasy and its as fresh as it gets. Chancy is now saying that there is NO need for buy store bought when we can make homemade pretty easily…I told him okay, as long as he does the kneading (and cleaning…haha!) and we made a deal.

Cant wait to see your creations! Make sure to always tag me on Instagram when you make my recipes! (@Alexafuelednaturally)
Easy Homemade Vegan Pasta
- Sift flour and salt into a large bowl.
- In a small bowl make your vegan eggs according to the directions on the package. For the Bob’s red mill it called for 1 tbsp mix + 2 tbsp of water to equal one “egg”.
- In a separate Bowl, mix 1/2 cup water, oil and vegan eggs together.
- Make a well in the middle of the flour/salt mixture.
- Pour liquid mixure into the well.
- With your fingers, knead until the dough pulls away from the sides of the bowl, then add the remainder of the water (1/4) cup. Keep kneading until dough forms. Like I said above this requires patience and lots of kneading. (The dough may appear to be rough and not smooth and thats ok. It will soften when you let is sit and rise.)
- Cover with plastic wrap and let rise for 1 hour on counter.
- Meanwhile make ricotta filling. Bring a small pot of water to a boil. Place your raw almonds into the boiling water. Let boil for 2 minutes.
- Drain the almonds immediately in a colander or strainer and rinse them with cold water to cool them. Blot the almonds dry with a paper towel.
- Use your fingers to gently squeeze the almonds and loosen the skin from them. Set skinless almonds in a bowl and set aside.
- Remove tofu from package and wrap in a clean kitchen towel or paper towel and squeeze for 20 seconds to allow for excess water to strain.
- In a food processor or high speed blender combine tofu, blanched almonds, nutritional yeast, unsweetened almond milk, garlic powder, onion powder, salt & pepper. Blend for 1-2 minutes or until there is no chunks. Mixture will look lumpy and that is okay! Add more almond milk if needed.
- In a small pan cook chopped spinach with 1 tbsp on water for 1 minute or until spinach is wilted down.
- Once ricotta mixture is made and spinach is ready, combine the two in a medium size bowl and mix well. Taste mixture and add any extra salt or seasonings if needed.
- Once dough has rested, either put it through your pasta roller OR separate it into 4 parts and roll out each part flat with a rolling pin. Roll as thin as possible, use a cooking cutter or a glass cup (3 1/2 diameter) and put the scraps to the side.
- Brush them with a light coating of warm water.
- In the center of each square, drop about 1/2 – 1 teaspoon ricotta filling. Don’t put too much…as it can squeeze out.
- Fold in half, Press all sides firmly. You can even stretch out the corners so they are easier to fold. Pick up the triangle, so the top is facing you. Pick it up and wrap the bottom corners around your fingertip. Press and seal the corners together.
- Boil the tortellini in lightly salted water for about 3 minutes. They will float to the top when almost ready. Remove them from the water and serve with marinera sauce or sauce of choice.
If you would like to freeze them and cook later:
Lay the tortellinis out of a baking sheet lined with parchment paper, making sure they do not touch. Place in the freezer for 30 minutes or until rock hard frozen. Then place them in a large zip lock back and put back into freezer until ready to cook and eat. Should store just fine in the freezer for many months!
* Refer to the step by step visual as it can help a ton when assembling the tortellinis!
Serves 5-6
Makes about 40 Tortellinis
For the pasta dough
- 3 cups flour, sifted
- 4 vegan eggs (I used bob’s red mill)
- 1 1/2 tsp avocado oil (or olive oil)
- 1 tsp salt
- 3/4 cup water (divided)
For the ricotta filling
- 1 (14 ounce) package of firm tofu
- 1 cup raw almonds
- 1/2 tsp salt
- 4 tbsp nutritional yeast
- 1/2 tbsp garlic powder
- 1/2 tbsp onion powder
- 1/4 tsp pepper
- 3 cups chopped spinach
- 1/2 cup unsweetened almond milk
For serving
- Marinera sauce
- Vegan part
- Fresh basil
- Chilli pepper flakes
OMG! VEGAN TORTELLINIS with a ricotta & spinach filling. In my pre vegan days, Chancy and I used to LOVE date nights that involved tortellinis. Every time we had the idea to make dinner it always involved store bought tortellinis + marinera sauce. Simple & delicious. When I became vegan three years ago it seemed that vegan tortellinis were simply not a thing in the grocery store. Yes, there are some vegan raviolis but lets please not compare the two! haha. I love tortellinis far more then raviolis. Who’s with me? So what helped evolve these delicious, home made tortellinis was the vegan pop dinner I host monthly with my friend Lila called; Blissful Gatherings. Each month we choose a different cuisine and create a menu. I knew I couldn’t do a Italian night without tortellinis. The major catch… I had never made them before from scratch! After 4 attempts I was able to master a perfect pasta dough and method to this beautiful madness.

Traditionally fresh pasta is made with egg. Thank the vegan gods for creating a vegan egg replacement. I used this one! The rest is just a simple combination of flour, water and a tiny bit of oil. I chose to use avocado oil.

A little patience is required for the creation of the pasta dough. The pasta dough will seem to be quite crumbly and rough but with some patience + lots of kneading it will turn out just fine! The left photo is the dough after only 3 minutes of kneading and the right photo is the dough after 7 minutes of kneading.

While the dough rests for an hour, the delicious and creamy ricotta will come to life! Just a simple mix of tofu, blanched almonds, spinach and spices.

Like I said, 4 different attempts were made until I found success. SO…I made you a step-by-step visual guide to make your life so much easier.


